As a project progresses, workflow complexity tends to grow. As we learn more about the data we are working with, business decisions based on project requirements lead to additional data sources being processed and new functionality being added. What began as a simple workflow can quickly grow into a complex web of tools that to an unfamiliar eye can take hours to dissect.
To compound on the growing complexity of a workflow, rarely do we have the luxury of working on one project at time. We often find ourselves splitting our attention between several projects. This inevitably leads to situations in which we are having to either set aside a workflow or hand it off to a peer to continue development. Thus, maintaining an informative revision history is an important part of any Alteryx project. Unfortunately, many workflow authors decide that documenting revisions can be too time consuming, especially when they are up against the clock to get updates in before a deadline.
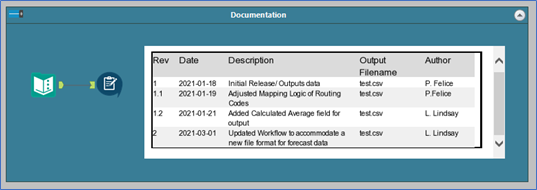
Here at Sea Cliff Consulting, we have developed a robust way to efficiently document workflow changes. The key is that the process allows you to manage all workflow changes within the workflow itself. This presents all revision updates upfront and eliminates the need to switch between different files to document or review revisions. Let’s explore exactly how we do this.

The Process
- Download our complimentary Revision History Macro. This macro creates an excel spreadsheet that can be reviewed external to the workflow and a PNG image file that can be displayed within your workflow. These files will allow for diligent and easy to understand change management.
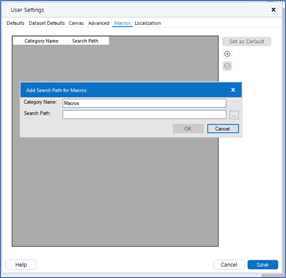
- Once the Revision History macro has been downloaded, simply add the location of the macro to your saved macro path. This can be done within Alteryx’s “User Settings” under the “Macros” tab. For more details on saving Macros, see Alteryx’s instructional page here.


- Within your workflow, create a Tool Container to distinguish where your Revision History information will be contained.
Sea Cliff Tip: Placing this container in the upper left-hand side of your workflow will make your revision history the first item you see, so that any user can be informed on the fly.
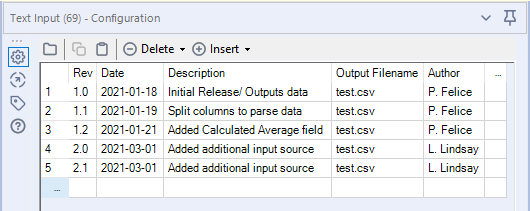
- Add a text input to your container. This text input will contain your revision history information and should be formatted with the following fields:
- Rev: Input your Revision Number in this field. Best practice is to update the digit to the left of the decimal on releases, milestones or major updates and the digit to the right of the decimal on smaller updates.
- Date: This date should represent the final date the related revisions were made.
- Description: This field allows the author to describe the changes that were made during the related revision update. This will allow future users to easily identify changes that have been made since they last opened the workflow.
- Output Filename: This field lists all outputs created by the workflow at the time of the revisions.
- Author: This fields list the revision author in order to create traceability and provide future authors a source to reference should they have questions.

- Add the Revision History Macro Tool from your Documentation Tab and populate the file path and names of the Revision History Excel and PNG files you would like to save within the tool’s configuration. Connect the Text Input tool to the input anchor of the Revision History macro and your files are ready to be written. Note: The PNG file is what will be displayed within the Alteryx workflow for all designers to see.
Sea Cliff Tip: Simply adding “./” along with your file name will output the file in the same folder as your workflow.

- Add an Explorer Box tool from the Documentation tab into the container. This tool will allow you to display the PNG created by the macro within the workflow. In the tool configuration, add the file path and name of your PNG file and select “Hide Address Bar” for a cleaner look. Once you have the image displayed you can adjust the size and zoom of the window. The recommendation is to set the scaling of this window to match the default zoom in Alteryx. Note: This tool will refresh either when the workflow is opened or with a right-click “Refresh” option.
- Run your workflow, right-click “Refresh” your explorer box, and you too now have a robust way to efficiently document workflow changes!
Want to take your documentation practices to the next level? Stay tuned for Sea Cliff’s next post on capturing workflow metadata…
Connect with Sea Cliff Consulting on LinkedIn to stay up to date with the latest on industry best practices along with providing feedback on what content you would like to see next.


